I have used Reaper for nearly a year now, and I was a bit concerned first if this software could be used for film scoring. After solving all the problems I came across, I decided to write this short step-by-step guide so you can start with your first projects using Reaper.
Reaper is a powerful software that is totally capable to handle film scoring. It can be a bit intimidating to get started with Reaper, but it usually offers a simple solution for every problem you run into. Sometimes it just can take a bit to know where to look for.
Table of content:
1) Load up your Template
If you are using a template, make sure to load it before changing any settings. I fail at this every time…
2) Choose the Right Sample Rate
You might have come across the term sample rate a few times. The typical values you see are 8.000 Hz, 44.100 Hz, and 48.000 Hz. The sampling rate tells us how many samples of audio get recorded each second. The higher the number, the more fluent it sounds.
An easy-to-understand analogy would be the number of frames per second (FPS) in a video file. The more frames are played in a second of the video, the fluent it gets.
Common sample rates:
- 8.000 Hz (8kHz) Phone call
- 44.100 Hz (44.1 kHz) Usually used for CD records.
- 48.000 Hz (48 kHz) Used for music in film
The first step is to change the sample rate of our project from 44.1 kHz to 48 kHz. Open the project settings by pressing “ALT + ENTER” or by browsing to “File” -> “Project settings”. In the first Tab you can enter the desired sample rate
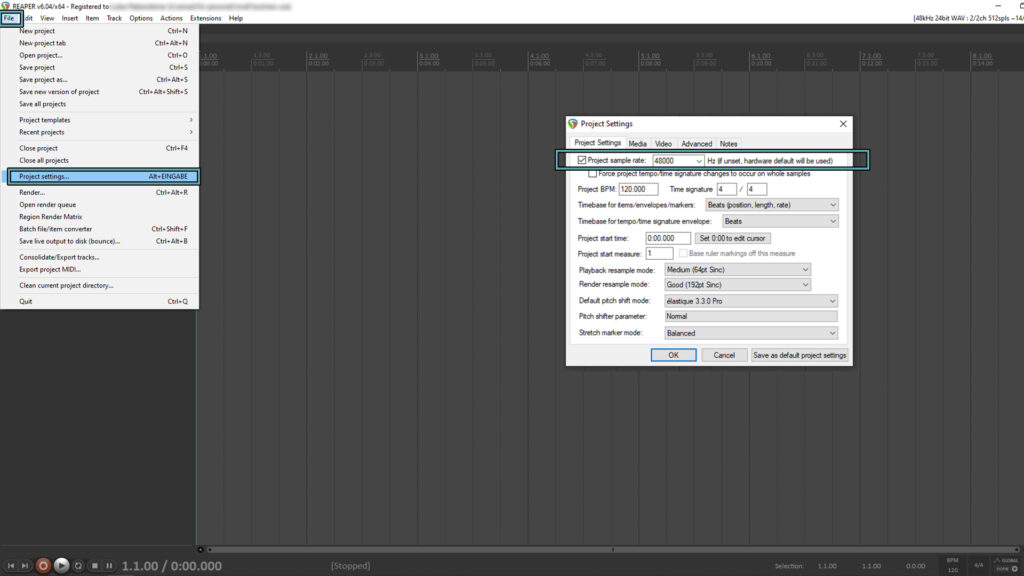
Even though it might not seem to make a huge impact, it is an industry-standard and can be a clear signal for the producer that the composer is new in the field if the sample rate has not been adjusted.
A higher sample rate also uses more storage space and processing power. Nowadays, it is not that big of a deal as it was in the starting era of digital music production.
3) Set the Right FPS-Value
Similar to the sample rate, we can change the FPS value inside the project settings. To find out the correct value, you can simply take a look at the properties of your source file. Under the tab “Details“, you can see the FPS count of the specific file. In this case, there are 25 frames per second.
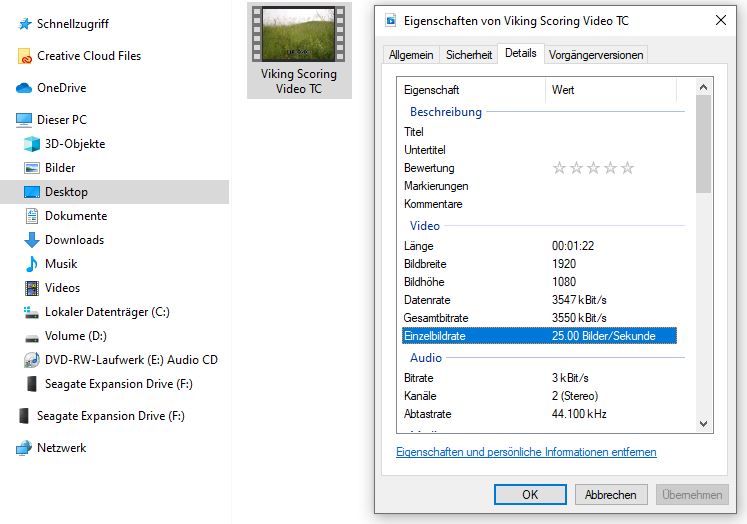
You can set your FPS-Value in Raper in the project settings by pressing “ALT + ENTER”, or following the path as written above.
4) Import the Video File
The file can be imported by simply drag and drop. Ist recommended creating a new track where the video file gets placed. As you noticed, Reaper automatically generates the audio waves of the scene.
In my case the video doesn’t have any audio itself, so no audio waves are shown.
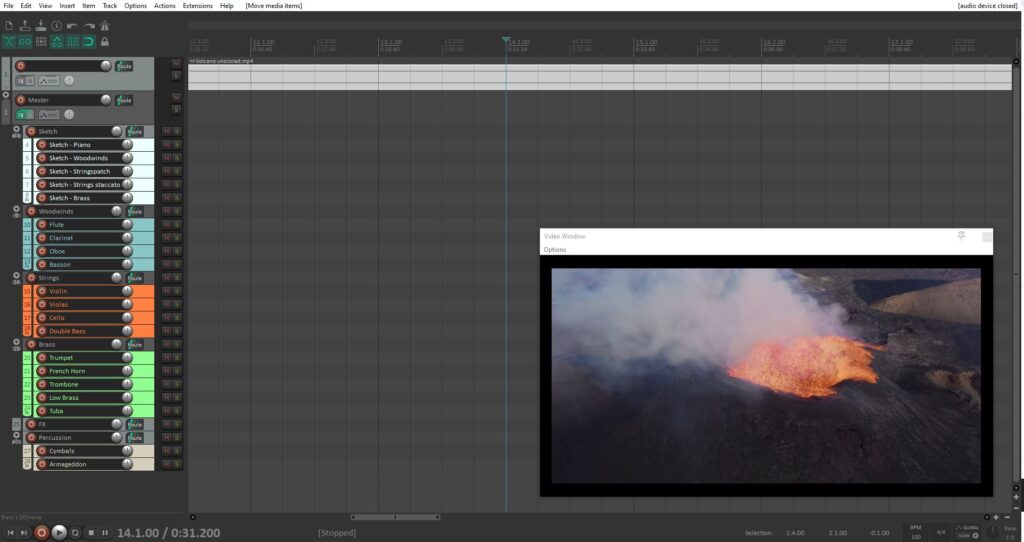
If you have trouble importing the video or you get an error with “could not be imported”, you need to know that Reaper uses codecs from third party video players. I recommend to install the VLC Media Player on your System. In the Reaper Properties you can see wich codecs are currently used.
You can get the VLC Media player here on ist Homepage: ► Download VLC Media Player
Restart your system after the installation and reaper should be able to import the file.
5) Video Settings
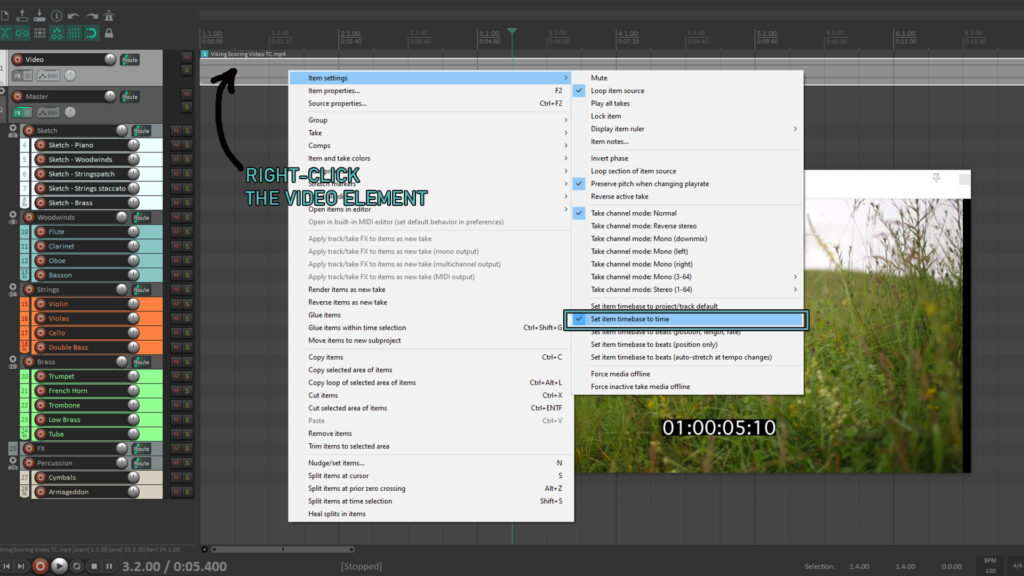
This might be the most important step in the process. If I changed the BPM to a faster tempo, the video would get compressed and be played faster. We need to change the item settings so it doesn’t get influenced by the BPM count.
You can change this by right-clicking the video element; under “Item settings“, you simply select “set item timebase to time“. Now, whenever you change the BPM, the video stays as it is.
6) Changing the ruler to show the Frames
In its default settings, the ruler on the top shows the number of the bar and the time signature in seconds. Discussions about the score with your producer are usually referenced with an exact frame number. This allows you to identify every moment in your score to the exact frame of the video.
Default setting: Number of bar and Timestamp

Show Frame Number and Timestamp

To show the frames, right-click on the ruler itself and choose “Hours:Minutes:Seconds:Frames” at the bottom.
7) Selecting Single Frames
Now we finally move more towards the scoring itself. Usually, one of the first steps is to spot the video and detect editing points where we want the music to land.
Reaper snaps to the beat and not to the frames when trying to select with the default setting. You can change this by right-clicking on the magnet icon in the top left corner and choosing Snap/Grid settings.
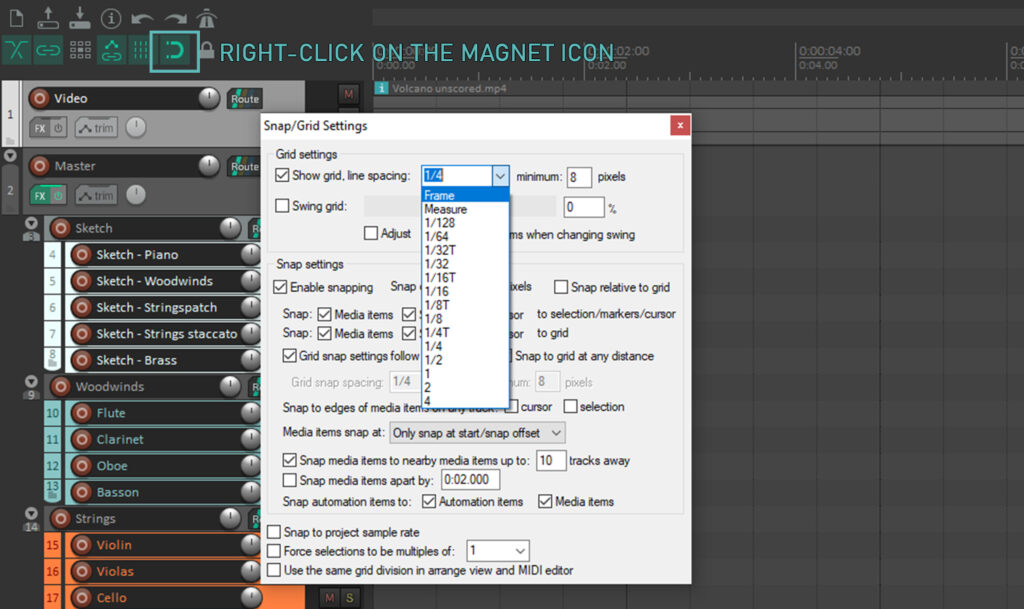
As you change the Snap from the default 1/4 to frame, you can select every single frame in your project. Notice that this also changes the grid in the background. I choose the default 1/4 Grid; when working on hits for a specific frame, I change to the frame grid.
8) Adding Markers
Markers are an easy way to organize your score. Detecting editing points is usually one of the first tasks. Try to figure out important edit points where you want your music to land. In my example, I choose to insert a marker when the title appears.
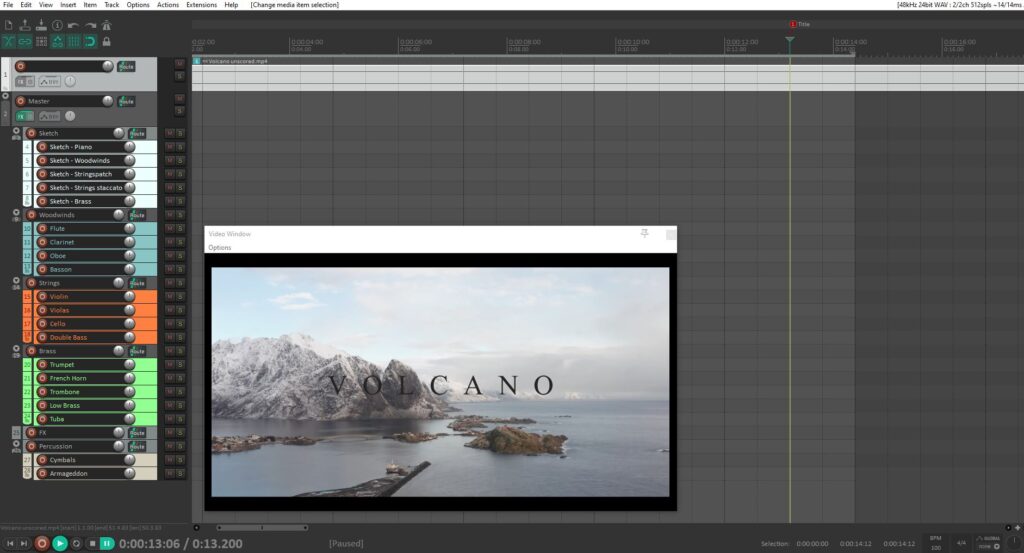
After you picked the desired frame, simply press “Shift + M” to set a marker. You can also insert a marker by right-clicking on the ruler on top. Give it a name to stay organized.
You can, later on, jump between your markers by pressing the numbers shown above the marker on your keyboard.
9) Adding Tempo/Time Signature Markers
Reaper offers two types of markers. The first one is a simple marker to organize your score. The second one is a so-called Tempo/Time signature Marker. This marker also has tempo settings and allows you to change the BPM throughout your track.
Changing the BPM at a Time Signature Marker affects the ongoing track until another Time Signature Marker sets a new BPM-Value.
To insert Tempo/Time signature Marker, press “Shift+C” or right-click on the ruler and select said marker.
You can also tell Reaper to gradually change the BPM between two markers to create a ritardando (becoming slower) or an accelerando (becoming faster).
10) Writing Music
We are finally at the point where we can write the music to the imported file.
Reaper is a powerful software that is totally capable to handle film scoring. It can be a bit intimidating to get started with Reaper, but it usually offers a simple solution for every problem you run into. Sometimes it just can take a bit to know where to look for.

